Archive for the ‘Tips and Tricks’ Category
The Real Value of Your Photography
26
Aug
2012
It’s nothing new in the world of photography to receive requests from hundreds of people over the course of a year if they are allowed use your image for free on various projects. While for the novice, this might be flattering, for any even halfway serious photographer it’s the worst kind of request. "Well, aren't you glad I asked and didn't just steal it? You just have to give it to me." — No, I don’t.
Honestly, I am actually more insulted when they ask to use an image for free than when just taking it. That way, I would at least have gotten a settlement claim out of it.
From time to time, a company or advertising agency licenses an image by going through the whole process with the required professionalism we photographers are thankful for. Clear terms, fair compensation for our work. Both sides happy. Very easy.

Apparently, this method proves to be rare, even to the largest companies out there… but read on.
I was recently asked by the [company’s product] OS Partnerships & Business Development team to license my image “Firestorm” to use in their upcoming OS update as a wallpaper choice and later on, in the same ways, in the [company’s product] browser and promotional material. I was beyond excited, not because of a huge check I saw in my near future but for such a large company recognizing my work. A company I trust with my daily online searches, personal data and much more; the company that probably knows more about me than I’d like to.
Fast forward to the licensing agreement I was asked to sign: NO COMPENSATION! Way to go, [company]. While I didn’t plan on retiring after licensing an image with [company], I was expecting at least a fair amount of compensation for a “Give us your image and we do whatever the f**k we want” kind of license.
After some serious consideration and various attempts, I could restrain myself and instead wrote a, what I think to be, moderate reply stating the following:
Dear Mrs. ___________,
I am not willing to accept the licensing agreement under the terms stated.
First off, when did [company] become a charitable organization?
Last time I checked, [company]'s yearly profit for the financial year 2011 was roughly US$ 10 billion with its stock price currently being the third highest in history. [Company] is not a small family owned business thinking everything on the internet is free. They should know better. Licensing images for wallpaper use always involves compensation. Apple, as well as Microsoft, paid the photographers for wallpapers they used in their operating systems well. (http://www.petapixel.com/2012/08/03/the-most-viewed-photo-of-all-time/ and http://www.petapixel.com/2010/04/06/the-photographers-behind-the-wallpapers/)
Why is [company] trying to claim usage rights without paying a fair amount?
I will not let my image go to a multi-million dollar S&P500 company for free. After all, it was you who approached me to license and use my photo in your browser operating system and possibly more than that, not vice versa.
[My licensing terms inserted here.]
In all honesty, would you be willing to work for free? Well, I certainly won't. Here's some further reading material, covering this exact situation: http://photoprofessionals.wordpress.com/
Looking forward to hearing back from you.
To me, it doesn’t come as a surprise I haven’t heard back from them and quite honestly, I don’t expect any kind of answer. The licensing contract they sent was a slap in the face of any photographer.
I ask you, my dear readers (who didn’t have a lot to read from me lately — sorry for that), would you be willing to work for free? Disregarding the industry. I blackened out the company’s name as I do not want start a bashing campaign or anything. I just needed to vent, inform people that even the largest tech companies out there with multi-billion dollar profits do NOT value the work of photographers.
That said, don’t sell yourself short. If I have learned one thing over the years, this is it.
I’d rather have no money in my pockets than knowing someone is falsely promoting their product with my image without paying a fair amount. No exorbitant high amount, a fair compensation.
Thanks for reading my ramblings and feel free to share with your friends, amateur and professional photographers alike, your grandma who might get a kick out of this or the advertising agency of your choice.
David
26
Aug
2012
It’s nothing new in the world of photography to receive requests from hundreds of people over the course of a year if they are allowed use your image for free on various projects. While for the novice, this might be flattering, for any even halfway serious photographer it’s the worst kind of request. "Well, aren't you glad I asked and didn't just steal it? You just have to give it to me." — No, I don’t.
Honestly, I am actually more insulted when they ask to use an image for free than when just taking it. That way, I would at least have gotten a settlement claim out of it.
From time to time, a company or advertising agency licenses an image by going through the whole process with the required professionalism we photographers are thankful for. Clear terms, fair compensation for our work. Both sides happy. Very easy.
Apparently, this method proves to be rare, even to the largest companies out there… but read on.
I was recently asked by the [company’s product] OS Partnerships & Business Development team to license my image “Firestorm” to use in their upcoming OS update as a wallpaper choice and later on, in the same ways, in the [company’s product] browser and promotional material. I was beyond excited, not because of a huge check I saw in my near future but for such a large company recognizing my work. A company I trust with my daily online searches, personal data and much more; the company that probably knows more about me than I’d like to.
Fast forward to the licensing agreement I was asked to sign: NO COMPENSATION! Way to go, [company]. While I didn’t plan on retiring after licensing an image with [company], I was expecting at least a fair amount of compensation for a “Give us your image and we do whatever the f**k we want” kind of license.
After some serious consideration and various attempts, I could restrain myself and instead wrote a, what I think to be, moderate reply stating the following:
Dear Mrs. ___________,
I am not willing to accept the licensing agreement under the terms stated.
First off, when did [company] become a charitable organization?
Last time I checked, [company]'s yearly profit for the financial year 2011 was roughly US$ 10 billion with its stock price currently being the third highest in history. [Company] is not a small family owned business thinking everything on the internet is free. They should know better. Licensing images for wallpaper use always involves compensation. Apple, as well as Microsoft, paid the photographers for wallpapers they used in their operating systems well. (http://www.petapixel.com/2012/08/03/the-most-viewed-photo-of-all-time/ and http://www.petapixel.com/2010/04/06/the-photographers-behind-the-wallpapers/)
Why is [company] trying to claim usage rights without paying a fair amount?
I will not let my image go to a multi-million dollar S&P500 company for free. After all, it was you who approached me to license and use my photo in your browser operating system and possibly more than that, not vice versa.
[My licensing terms inserted here.]
In all honesty, would you be willing to work for free? Well, I certainly won't. Here's some further reading material, covering this exact situation: http://photoprofessionals.wordpress.com/
Looking forward to hearing back from you.
To me, it doesn’t come as a surprise I haven’t heard back from them and quite honestly, I don’t expect any kind of answer. The licensing contract they sent was a slap in the face of any photographer.
I ask you, my dear readers (who didn’t have a lot to read from me lately — sorry for that), would you be willing to work for free? Disregarding the industry. I blackened out the company’s name as I do not want start a bashing campaign or anything. I just needed to vent, inform people that even the largest tech companies out there with multi-billion dollar profits do NOT value the work of photographers.
That said, don’t sell yourself short. If I have learned one thing over the years, this is it.
I’d rather have no money in my pockets than knowing someone is falsely promoting their product with my image without paying a fair amount. No exorbitant high amount, a fair compensation.
Thanks for reading my ramblings and feel free to share with your friends, amateur and professional photographers alike, your grandma who might get a kick out of this or the advertising agency of your choice.
David
Everything on the Internet is Free
11
Oct
2011
I had planned to share some more images today but this idea was quickly turned down by a thoughtful post on Tony Wu’s blog that I felt needed my commentary here too.
Tony Wu is a professional underwater photographer whose work I regularly check out because it takes your breath away. Got it? Underwater photography – breath…. never mind. Anyway, I highly recommend checking out his portfolio. It oozes greatness.
While we’re at it and this is the whole reason of this blog post…
Can I have one of your images for free, Tony? It would make a great background for my non-commercial site! Thanks in advance.
The problem is right there. Everybody believes anything on the internet is free to use for any matter you can think of and to some degree, I think this is true for about anyone on the internet, me included. Hey, I am not Mother Theresa either but truth be told, a quick Google image search revealed my images on blogs in Japan, Brazil, Zimbabwe and a couple dozen other countries; most recently on a photography website in Portugal. Yes, they gave me credit – at least.
However, I can’t even count the numerous times I have gotten requests to use my images for free for whatever reason, which I sometimes felt bad to decline, but mostly was just annoyed or even amused to some degree about the impolite way of asking for it. As a person trying to make a living with photography, you just cannot live off of water, love and image credit. You need money in the bank to support your family and travel to all those fancy places you like to decorate your homepage with, you save the environment with and help a fellow of yours out for a great cause. That’s fine and all, but while you help others, you’re not helping me. Every image spread across whatever medium that I did not get paid for, is one place less traveled and photographed. Think about it. Do this a couple of times more and you might have nothing left to take for free.
Tony’s thoughtful blog post covers just this experience and the way to handle requests. There is just no perfect way to respond but Tony’s way of dealing with it proves to be a real time keeper, raises valid points for the “right-grabbers” to consider and to eventually change their habits. (Which, in all honesty, I doubt.) Read the whole response here and share with whomever you think might enjoy it. It’s free!

So let it be that, another rambling. Remember, not everything on the web is free! 😉
11
Oct
2011
I had planned to share some more images today but this idea was quickly turned down by a thoughtful post on Tony Wu’s blog that I felt needed my commentary here too.
Tony Wu is a professional underwater photographer whose work I regularly check out because it takes your breath away. Got it? Underwater photography – breath…. never mind. Anyway, I highly recommend checking out his portfolio. It oozes greatness.
While we’re at it and this is the whole reason of this blog post…
Can I have one of your images for free, Tony? It would make a great background for my non-commercial site! Thanks in advance.
The problem is right there. Everybody believes anything on the internet is free to use for any matter you can think of and to some degree, I think this is true for about anyone on the internet, me included. Hey, I am not Mother Theresa either but truth be told, a quick Google image search revealed my images on blogs in Japan, Brazil, Zimbabwe and a couple dozen other countries; most recently on a photography website in Portugal. Yes, they gave me credit – at least.
However, I can’t even count the numerous times I have gotten requests to use my images for free for whatever reason, which I sometimes felt bad to decline, but mostly was just annoyed or even amused to some degree about the impolite way of asking for it. As a person trying to make a living with photography, you just cannot live off of water, love and image credit. You need money in the bank to support your family and travel to all those fancy places you like to decorate your homepage with, you save the environment with and help a fellow of yours out for a great cause. That’s fine and all, but while you help others, you’re not helping me. Every image spread across whatever medium that I did not get paid for, is one place less traveled and photographed. Think about it. Do this a couple of times more and you might have nothing left to take for free.
Tony’s thoughtful blog post covers just this experience and the way to handle requests. There is just no perfect way to respond but Tony’s way of dealing with it proves to be a real time keeper, raises valid points for the “right-grabbers” to consider and to eventually change their habits. (Which, in all honesty, I doubt.) Read the whole response here and share with whomever you think might enjoy it. It’s free!
So let it be that, another rambling. Remember, not everything on the web is free! 😉
Summer Update: The Good, The Bad & The Ugly
03
Oct
2011
Without further ado, I am back in the saddle again after what seems like a terrible long late spring and summer break and before I even realized, the fall season starts to kick in with some really nice days for us here in Germany.
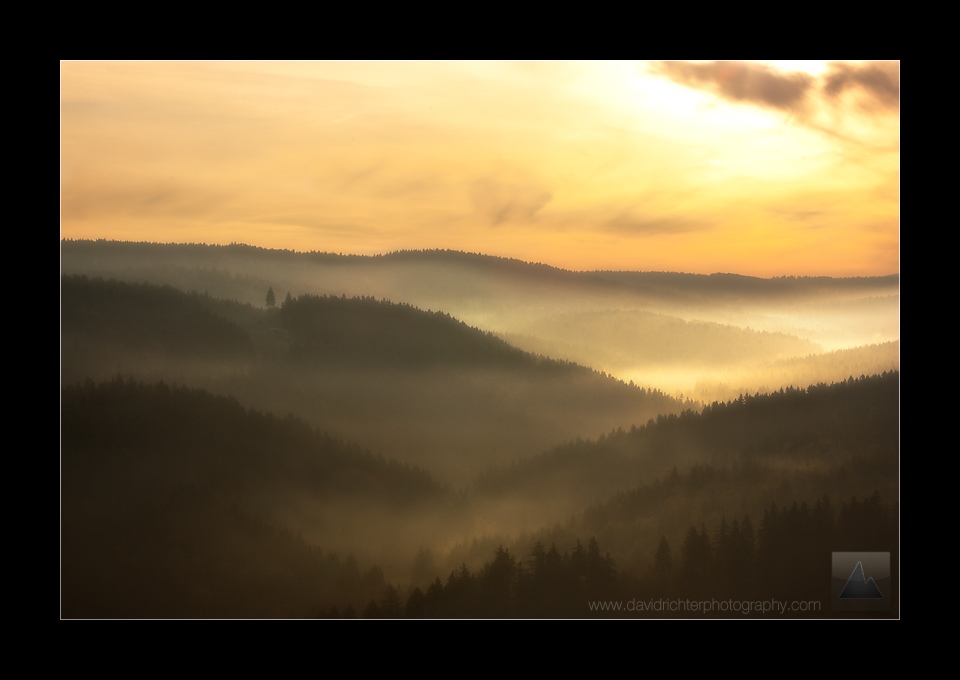
Last week I was finally able to catch a sunrise over the Ore Mountain ridges with a little fog settling in the valleys below, becoming illuminated by the wonderful warm sunlight hitting just the top layers and creating a somewhat mysterious atmosphere.
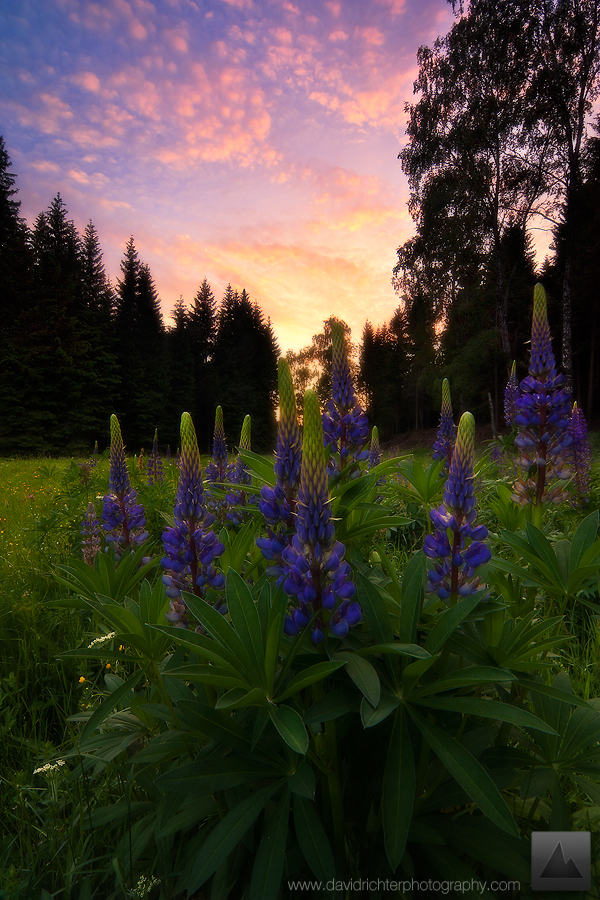
Then, I am on to share another shot from Germany taken some months ago at one of my favorite spots for lupines in the whole region. This year, the flowers were not as abundant as in the previous years but the sky was certainly one of the best I have ever seen here. Enjoy.
Now for the bad and ugly and back to the good. An odyssey in the customer service industry in Germany.
Many of you know, as a landscape photographer, your shooting and well-feeling in the field, stands and falls with your gear and we’re not talking about cameras and lenses here, but rather hard- and soft-shell jackets and pants, water-proof boots, etc. Either way, I was pretty disappointed in recently acquired gear, two hardshell jackets to name it, that literally failed on the first time wearing them.
I contacted the manufacturer, who, in the US, is known for the best of the best in customer service, but apparently, things move at a different speed here in Germany and my experience was far off of pleasant. I honestly did not expect them to send two new jackets out my way but at least some sort of apology with the request to send the jackets in for inspection of the matter or anything in this direction, but not so, instead they send me the following lines back. “Of course it is always a pity if a beloved product doesn’t function the way it used to.” What? Excuse me? Did you just say beloved product? I am really sorry, but I didn’t have time to enjoy said product(s) at all because they failed miserably the first time out in the field.
Long story short, I contacted the online retailer where I got both jackets and this time, I was more than pleased and received more than I ever expected after the first experience with the manufacturer. Not only they offered me to send me in the gear at no cost, picked up from my doorstep, the communication was super friendly and I knew at any point what was going on, where my gear has headed, etc. They handled the matter to my fullest satisfaction, but now you need to know who I was so pleased to deal with, huh?

bergfreunde.de is where it’s at, folks. At least if you want to shop for outdoor gear in Germany.
For recommendations on where to buy your gear, please refer to the links section of my website. Thanks for letting me rant. Oh wait, this is MY blog. Haha!
I know I said this in the past and failed, but it won’t be too long till the next update.
03
Oct
2011
Without further ado, I am back in the saddle again after what seems like a terrible long late spring and summer break and before I even realized, the fall season starts to kick in with some really nice days for us here in Germany.
Last week I was finally able to catch a sunrise over the Ore Mountain ridges with a little fog settling in the valleys below, becoming illuminated by the wonderful warm sunlight hitting just the top layers and creating a somewhat mysterious atmosphere.
Then, I am on to share another shot from Germany taken some months ago at one of my favorite spots for lupines in the whole region. This year, the flowers were not as abundant as in the previous years but the sky was certainly one of the best I have ever seen here. Enjoy.
Now for the bad and ugly and back to the good. An odyssey in the customer service industry in Germany.
Many of you know, as a landscape photographer, your shooting and well-feeling in the field, stands and falls with your gear and we’re not talking about cameras and lenses here, but rather hard- and soft-shell jackets and pants, water-proof boots, etc. Either way, I was pretty disappointed in recently acquired gear, two hardshell jackets to name it, that literally failed on the first time wearing them.
I contacted the manufacturer, who, in the US, is known for the best of the best in customer service, but apparently, things move at a different speed here in Germany and my experience was far off of pleasant. I honestly did not expect them to send two new jackets out my way but at least some sort of apology with the request to send the jackets in for inspection of the matter or anything in this direction, but not so, instead they send me the following lines back. “Of course it is always a pity if a beloved product doesn’t function the way it used to.” What? Excuse me? Did you just say beloved product? I am really sorry, but I didn’t have time to enjoy said product(s) at all because they failed miserably the first time out in the field.
Long story short, I contacted the online retailer where I got both jackets and this time, I was more than pleased and received more than I ever expected after the first experience with the manufacturer. Not only they offered me to send me in the gear at no cost, picked up from my doorstep, the communication was super friendly and I knew at any point what was going on, where my gear has headed, etc. They handled the matter to my fullest satisfaction, but now you need to know who I was so pleased to deal with, huh?
![]()
bergfreunde.de is where it’s at, folks. At least if you want to shop for outdoor gear in Germany.
For recommendations on where to buy your gear, please refer to the links section of my website. Thanks for letting me rant. Oh wait, this is MY blog. Haha!
I know I said this in the past and failed, but it won’t be too long till the next update.
Dodge and Burn – A Darkroom Technique Digitalized
26
Apr
2011
This is going to be my first written tutorial ever, so please bear with me. I will try to keep this short, fun (How fun can it be to sit in front of a screen instead of being out shooting?) and informative, even though that aspect might not lie in my hands as I don’t know your skill level, after all.
Dodging and burning an image, in other terms, lightening and darkening pixels has been around since the dark age of film photography – just without the pixels though. One person who brought dodge/burn to the next level and perfected the craft was certainly Ansel Adams. Without wanting to get too much into the history of photography, this technique has been around for long and will continue to be so and for good reason.
But all that aside, let’s get down to business. As you might have heard, Adobe Photoshop has specific tools for those actions (Shortcuts – Mac/PC: “O” [“Shift” + “O”]), but while using those tools on a layer of pixels gets the job done, it is not advisable to do so. Working directly on your image and not an adjustment layer of any kind will in the long term degrade the quality of your work. Think of the following situation, you worked for hours on a scene, improving, tweaking and refining. You save your work, get it printed and then realize you dodged certain areas too much or too little, all the tweaking you did introduced noise, artifacts or halos where dark edges stand against a bright ground, which was not noticeable on the screen but now becomes problematic in print; but you cannot simply go back and alter the adjustments as you worked directly on your image layer. All the effort you put in, all of a sudden, becomes useless and you need to start off another Photoshop session.
A non-destructive workflow is the magic word here and I am sure you have heard about it but were never too sure what it involved. While this is not my topic for this tutorial, please check out Sean Bagshaw’s thoughtful post on the PhotoCascadia blog, where he shares deep and helpful insights in his processing workflow: http://photocascadia.wordpress.com/2011/02/23/is-your-processing-workflow-non-destructive/.
So how can I make use of this technique for dodging and burning? Please read on. The basic idea is to “outsource” the technique from the pixel layer to an adjustment layer that can be altered whenever you open your PSD or TIFF file.
First thing we need to do is to create a new layer and fill it with 50% gray.
To do this, hold “Shift” + “Command” + “Option” + “N” on a Mac and “Shift” + “Ctrl” + “Alt” + “N” on a PC; which will create a new layer on top of the current layer you are working on.
Then, go to Edit > Fill (or use the shortcuts: “Shift + “Delete” on a Mac / “Shift + Backspace” on a PC) which will open the Fill dialog box. Set the “Use”-option to 50% gray, blending mode normal and opacity to 100%, as shown below.

We’re almost done. Last thing we need to do, is to set the blend mode of the dodge and burn layer to soft light and we’re good to go.
To save you some time, I have created a Photoshop action for you to download. Just read on, the download link will be found at the end of this tutorial.
But how does it work? Who is familiar with the blend modes in Photoshop knows that the soft light blending mode will proportionally highlight or darken the layer underneath by the amount it is lighter or darker than 50% gray. That said, painting white on the dodge and burn layer will highlight the portion (dodge) while painting over it, while black will darken (burn) the part of the image. All this can be revoked by painting over the layer with 50% gray set as you brush color. Fairly easy, huh?
Results? You asked for them. Here is a recently reprocessed image from Mesa Arch in Canyonlands NP, Utah. I used a dodge and burn layers to highlight some of the foreground rocks that were touched by the presence of the rising sun but still felt a little too dark and to darken the sunbeam for a more aesthetic appeal, as well as light dodging and burning to even out the exposure.
Final image: (Mouseover for the pre-dodge and burn image!)

Dodge and burn layer:

26
Apr
2011
This is going to be my first written tutorial ever, so please bear with me. I will try to keep this short, fun (How fun can it be to sit in front of a screen instead of being out shooting?) and informative, even though that aspect might not lie in my hands as I don’t know your skill level, after all.
Dodging and burning an image, in other terms, lightening and darkening pixels has been around since the dark age of film photography – just without the pixels though. One person who brought dodge/burn to the next level and perfected the craft was certainly Ansel Adams. Without wanting to get too much into the history of photography, this technique has been around for long and will continue to be so and for good reason.
But all that aside, let’s get down to business. As you might have heard, Adobe Photoshop has specific tools for those actions (Shortcuts – Mac/PC: “O” [“Shift” + “O”]), but while using those tools on a layer of pixels gets the job done, it is not advisable to do so. Working directly on your image and not an adjustment layer of any kind will in the long term degrade the quality of your work. Think of the following situation, you worked for hours on a scene, improving, tweaking and refining. You save your work, get it printed and then realize you dodged certain areas too much or too little, all the tweaking you did introduced noise, artifacts or halos where dark edges stand against a bright ground, which was not noticeable on the screen but now becomes problematic in print; but you cannot simply go back and alter the adjustments as you worked directly on your image layer. All the effort you put in, all of a sudden, becomes useless and you need to start off another Photoshop session.
A non-destructive workflow is the magic word here and I am sure you have heard about it but were never too sure what it involved. While this is not my topic for this tutorial, please check out Sean Bagshaw’s thoughtful post on the PhotoCascadia blog, where he shares deep and helpful insights in his processing workflow: http://photocascadia.wordpress.com/2011/02/23/is-your-processing-workflow-non-destructive/.
So how can I make use of this technique for dodging and burning? Please read on. The basic idea is to “outsource” the technique from the pixel layer to an adjustment layer that can be altered whenever you open your PSD or TIFF file.
First thing we need to do is to create a new layer and fill it with 50% gray.
To do this, hold “Shift” + “Command” + “Option” + “N” on a Mac and “Shift” + “Ctrl” + “Alt” + “N” on a PC; which will create a new layer on top of the current layer you are working on.
Then, go to Edit > Fill (or use the shortcuts: “Shift + “Delete” on a Mac / “Shift + Backspace” on a PC) which will open the Fill dialog box. Set the “Use”-option to 50% gray, blending mode normal and opacity to 100%, as shown below.
We’re almost done. Last thing we need to do, is to set the blend mode of the dodge and burn layer to soft light and we’re good to go.
To save you some time, I have created a Photoshop action for you to download. Just read on, the download link will be found at the end of this tutorial.
But how does it work? Who is familiar with the blend modes in Photoshop knows that the soft light blending mode will proportionally highlight or darken the layer underneath by the amount it is lighter or darker than 50% gray. That said, painting white on the dodge and burn layer will highlight the portion (dodge) while painting over it, while black will darken (burn) the part of the image. All this can be revoked by painting over the layer with 50% gray set as you brush color. Fairly easy, huh?
Results? You asked for them. Here is a recently reprocessed image from Mesa Arch in Canyonlands NP, Utah. I used a dodge and burn layers to highlight some of the foreground rocks that were touched by the presence of the rising sun but still felt a little too dark and to darken the sunbeam for a more aesthetic appeal, as well as light dodging and burning to even out the exposure.
Final image: (Mouseover for the pre-dodge and burn image!)
Dodge and burn layer:
A Landscape Photographer’s Approach to Food Photography
27
May
2010
Hello and welcome to a new tale of truly yours. For those who were wondering, I am still alive and I even got out shooting some spring greens over the last few weeks. Spare time to post some extended reports on here was rare though and I’d like to apologize for that. I hope to make it up with some mouth-watering shots straight from hell’s my kitchen.
Some of you might wonder what’s the deal with me shooting food now. To cut the long story short, when the landscape and sky are rather dull, and quite frankly, they were pretty much all time this year, it’s great to have something to shoot in or around the house. While spring flowers like tulips and ranunculus have there fixed position in my yearly things to do in spring list, it’s always nice to venture out into a new field of photography. May it be the challenge of some sort, with its own limitations and a way to broaden one’s horizon or simply the fact to learn a new technique for a certain style of shooting which you can adapt to other fields of photography.

Fennel Orange Salad with cucumber, red onion and pear.
For me, it was kind of both. While cooking is nothing new to me, cooking for photos certainly is. I am not a professional food stylist my any means nor do I spill a gallon of motor oil over the salad to make it look, well, tasty. It’s rather the fact how you put the food on the plate. When cooking for friends, I take great care about how the food looks on the table. While you might think that is nothing different for photos, you err. Making food look good on the plate alone is one thing, making it look good in the photos you take is a different kettle of fish.

Beef, lettuce hearts, ripe mango, red onion rings, Parmesan cheese and mango garlic mayo between sesame and black cumin seed bun.
I am sure some professional food stylists and photographers will laugh at my approach but what do I care? Being a landscape photographer at heart, I tried to bring the basic principles of composition onto the plate, all spiced up by some high key treatment. These concepts, of course, are leading lines, some kind of foreground element that pulls the viewer into the scene and the rule of thirds. You can find these concepts perfectly illustrated and adapted to landscape photography in the article “Understanding Composition” at the Aperture Academy website which I highly recommend.

That being said, I hope you feel somewhat satiated and remember to try something new and challenging when the light isn’t just right and if you like, share your experiments here on the blog.
I’ll be back with flowers and waterfall pictures next week. Please excuse me while I plan my 3 month US trip this summer. California watch out! LOL
David
P.S. I also played around with the new possibilities of CSS3 and jQuery to add to my website later. Head over to the new and improved contact form and let me know what you think. It features my take at the iPhone unlock slider, which ironically doesn’t work on the iPhone itself yet but I am working on it.
27
May
2010
Hello and welcome to a new tale of truly yours. For those who were wondering, I am still alive and I even got out shooting some spring greens over the last few weeks. Spare time to post some extended reports on here was rare though and I’d like to apologize for that. I hope to make it up with some mouth-watering shots straight from hell’s my kitchen.
Some of you might wonder what’s the deal with me shooting food now. To cut the long story short, when the landscape and sky are rather dull, and quite frankly, they were pretty much all time this year, it’s great to have something to shoot in or around the house. While spring flowers like tulips and ranunculus have there fixed position in my yearly things to do in spring list, it’s always nice to venture out into a new field of photography. May it be the challenge of some sort, with its own limitations and a way to broaden one’s horizon or simply the fact to learn a new technique for a certain style of shooting which you can adapt to other fields of photography.
Fennel Orange Salad with cucumber, red onion and pear.
For me, it was kind of both. While cooking is nothing new to me, cooking for photos certainly is. I am not a professional food stylist my any means nor do I spill a gallon of motor oil over the salad to make it look, well, tasty. It’s rather the fact how you put the food on the plate. When cooking for friends, I take great care about how the food looks on the table. While you might think that is nothing different for photos, you err. Making food look good on the plate alone is one thing, making it look good in the photos you take is a different kettle of fish.
Beef, lettuce hearts, ripe mango, red onion rings, Parmesan cheese and mango garlic mayo between sesame and black cumin seed bun.
I am sure some professional food stylists and photographers will laugh at my approach but what do I care? Being a landscape photographer at heart, I tried to bring the basic principles of composition onto the plate, all spiced up by some high key treatment. These concepts, of course, are leading lines, some kind of foreground element that pulls the viewer into the scene and the rule of thirds. You can find these concepts perfectly illustrated and adapted to landscape photography in the article “Understanding Composition” at the Aperture Academy website which I highly recommend.
That being said, I hope you feel somewhat satiated and remember to try something new and challenging when the light isn’t just right and if you like, share your experiments here on the blog.
I’ll be back with flowers and waterfall pictures next week. Please excuse me while I plan my 3 month US trip this summer. California watch out! LOL
David
P.S. I also played around with the new possibilities of CSS3 and jQuery to add to my website later. Head over to the new and improved contact form and let me know what you think. It features my take at the iPhone unlock slider, which ironically doesn’t work on the iPhone itself yet but I am working on it.