 Tuesday, April 26th, 2011
Dodge and Burn – A Darkroom Technique Digitalized
This is going to be my first written tutorial ever, so please bear with me. I will try to keep this short, fun (How fun can it be to sit in front of a screen instead of being out shooting?) and informative, even though that aspect might not lie in my hands as I don’t know your skill level, after all.
Dodging and burning an image, in other terms, lightening and darkening pixels has been around since the dark age of film photography – just without the pixels though. One person who brought dodge/burn to the next level and perfected the craft was certainly Ansel Adams. Without wanting to get too much into the history of photography, this technique has been around for long and will continue to be so and for good reason.
But all that aside, let’s get down to business. As you might have heard, Adobe Photoshop has specific tools for those actions (Shortcuts – Mac/PC: “O” [“Shift” + “O”]), but while using those tools on a layer of pixels gets the job done, it is not advisable to do so. Working directly on your image and not an adjustment layer of any kind will in the long term degrade the quality of your work. Think of the following situation, you worked for hours on a scene, improving, tweaking and refining. You save your work, get it printed and then realize you dodged certain areas too much or too little, all the tweaking you did introduced noise, artifacts or halos where dark edges stand against a bright ground, which was not noticeable on the screen but now becomes problematic in print; but you cannot simply go back and alter the adjustments as you worked directly on your image layer. All the effort you put in, all of a sudden, becomes useless and you need to start off another Photoshop session.
A non-destructive workflow is the magic word here and I am sure you have heard about it but were never too sure what it involved. While this is not my topic for this tutorial, please check out Sean Bagshaw’s thoughtful post on the PhotoCascadia blog, where he shares deep and helpful insights in his processing workflow: http://photocascadia.wordpress.com/2011/02/23/is-your-processing-workflow-non-destructive/.
So how can I make use of this technique for dodging and burning? Please read on. The basic idea is to “outsource” the technique from the pixel layer to an adjustment layer that can be altered whenever you open your PSD or TIFF file.
First thing we need to do is to create a new layer and fill it with 50% gray.
To do this, hold “Shift” + “Command” + “Option” + “N” on a Mac and “Shift” + “Ctrl” + “Alt” + “N” on a PC; which will create a new layer on top of the current layer you are working on.
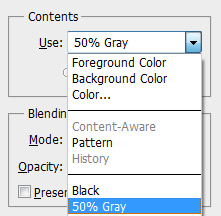
Then, go to Edit > Fill (or use the shortcuts: “Shift + “Delete” on a Mac / “Shift + Backspace” on a PC) which will open the Fill dialog box. Set the “Use”-option to 50% gray, blending mode normal and opacity to 100%, as shown below.

We’re almost done. Last thing we need to do, is to set the blend mode of the dodge and burn layer to soft light and we’re good to go.
To save you some time, I have created a Photoshop action for you to download. Just read on, the download link will be found at the end of this tutorial.
But how does it work? Who is familiar with the blend modes in Photoshop knows that the soft light blending mode will proportionally highlight or darken the layer underneath by the amount it is lighter or darker than 50% gray. That said, painting white on the dodge and burn layer will highlight the portion (dodge) while painting over it, while black will darken (burn) the part of the image. All this can be revoked by painting over the layer with 50% gray set as you brush color. Fairly easy, huh?
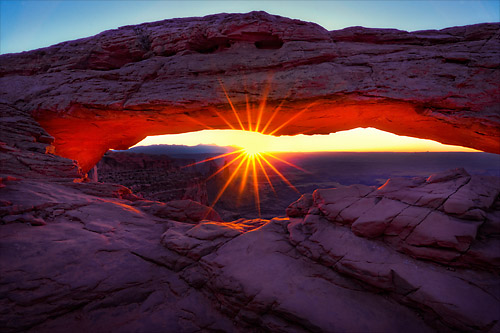
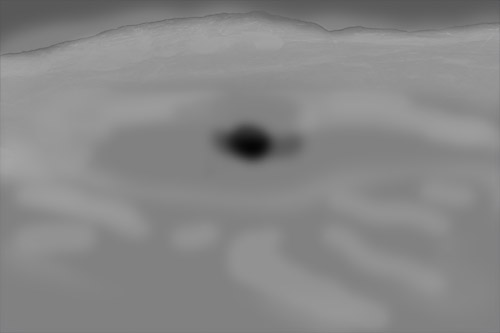
Results? You asked for them. Here is a recently reprocessed image from Mesa Arch in Canyonlands NP, Utah. I used a dodge and burn layers to highlight some of the foreground rocks that were touched by the presence of the rising sun but still felt a little too dark and to darken the sunbeam for a more aesthetic appeal, as well as light dodging and burning to even out the exposure.
Final image: (Mouseover for the pre-dodge and burn image!)

Dodge and burn layer:

Download PDF of this tutorial Download Photoshop action

05:21
PM
26 Apr
2011
You posted the final work and the dodge & burn layer, but it would be helpful to us visual learners see the original, unmodified image so we can see what the before & after difference is